How To Talk Back To A Remote/How To Program The TB Button
Wheatstone IP Audio Consoles have a TB button for talkback. How does it work?
Normal Use Case - TB to Remote
1. Route the microphone you want to use to the Talkback Mic destination for the console. It will look like this:

You might be tempted to lock this destination so it doesn't get changed. But when you do that, it can take control of the logic (LIOs) of the microphone source and that would break tally lights and on air warning lights. If you want to lock the destination, create an alias of the microphone, route the alias to the Talkback Mic destination, and then lock the alias instead,

The prefix for the console sources and destinations will vary with the console model.
2. Route the bus minus for the fader your remote is routed to to the destination that feeds return audio to the field.
Example: the remote codec that you are using is routed to fader 5. Locate the source called BM05:
Route this source to the destination that feeds the codec. Now the remote will hear program minus fader 5, which means they will hear everything on the air but they won't hear themselves. We want this because otherwise the remote will hear themselves on delay in the return anywhere from a half second to a second late (depending upon your codec) and that will make it hard for them to talk.
3. When you press the TB button, you will interrupt the bus minus with the talkback mic and speak with your talent off air. (Put the fader in cue so you can hear them!) When you turn the TB button off, the bus minus feed will automatically return so the talent can hear what's on the air again.
Special Use Case - TB to Headphones
Suppose we have a LXE being used in Talk Radio and the board operator needs to talk to people in a different booth by interrupting the headphones in their talent stations.
On other consoles we would need to program a Spare button for this. But since every button on the LXE can be customized, we can reprogram the default function of the TB button (Talkback) to instead be a Scripted Button and do a custom action.
1. Start in the LXE Setup GUI. If you have not recently done a System Scan in the GUI, do one now so the GUI has a current list of sources and destinations. After connecting to the console, go to WheatNet IP System and choose System Scan. Follow the prompts to scan the blades to get a current list and click Finish.
2. Now click on the TB button you want to customize in the GUI. The button will be highlighted.
For Function, you will see that it is set to Talkback. Click the drop-down to change this to Scripted Button
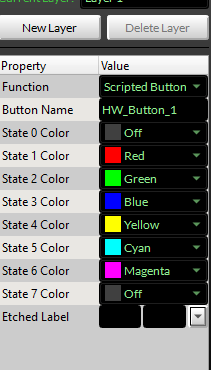
If you'd like, you can change the Button Name to something more descriptive. There are no spaces allowed. When you're ready, click on the Script Wizard tab.
The Function you want to choose is Momentary XYC
(momentary X-Y connection). Press the button with the three dots to choose the Destination (the destination that feeds the headphones you want to interrupt) and double-click that in the picker window to choose it. Repeat for the Source, choosing the microphone you are using for talkback.
(momentary X-Y connection). Press the button with the three dots to choose the Destination (the destination that feeds the headphones you want to interrupt) and double-click that in the picker window to choose it. Repeat for the Source, choosing the microphone you are using for talkback.
Click the grey Apply button in the lower left, then the red Apply button in the lower right.
This will reprogram the button to make a momentary connection. When you turn off the TB button, the previous route in the headphones will return.
Related Articles
How To Talk Back To A Remote/How To Program The TB Button
Wheatstone IP Audio Consoles have a TB button for talkback. How does it work? 1. Route the microphone you want to use to the Talkback Mic destination for the console. It will look like this: You might be tempted to lock this destination so it doesn't ...How To Talk Back To A Remote/How To Program The TB Button
Wheatstone IP Audio Consoles have a TB button for talkback. How does it work? 1. Route the microphone you want to use to the Talkback Mic destination for the console. It will look like this: You might be tempted to lock this destination so it doesn't ...How To Talk Back To A Remote/How To Program The TB Button
Wheatstone IP Audio Consoles have a TB button for talkback. How does it work? 1. Route the microphone you want to use to the Talkback Mic destination for the console. It will look like this: You might be tempted to lock this destination so it doesn't ...How To Talk Back To A Remote/How To Program The TB Button
Wheatstone IP Audio Consoles have a TB button for talkback. How does it work? 1. Route the microphone you want to use to the Talkback Mic destination for the console. It will look like this: You might be tempted to lock this destination so it doesn't ...Remote LXE Manual
Remote LXE is a software program that allows you to control your LXE console remotely. For example, let's say you are going to do a remote broadcast and want to control all the elements of the broadcast from the remote site. As long as you have an ...