Configuring Arista Networks Switches for WheatNet-IP
What you will need:
- A RJ-45 to serial console cable. We like the ones that have a little USB to serial device built in like this, but any standard console cable will do.
It connects to the console port on the switch.
- A terminal program such as PuTTY.
Step 1: Log into the switch
Arista switches come out of the box set up for ZeroTouch provisioning. If your facility is set up for that, follow your company's procedures to get the switch online. This guide assumes that you are not using ZeroTouch and need to manually configure the switch.
Set your serial port as follows:
- 9600 baud
- no flow control
- 1 stop bit
- no parity bits
- 8 data bits
Connect your console cable, open a serial session in PuTTY with the COM port your console cable is on and power up the switch.
The default login is admin with no password.

If you miss this login screen and the switch starts cycling looking for a ZeroTouch server (it looks like this)
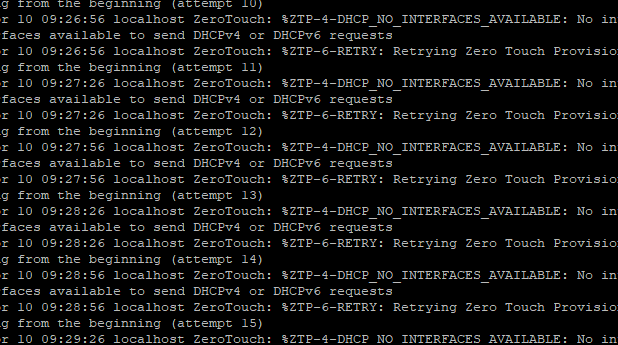
Hit Ctrl + C to get a login prompt.
Hit Ctrl + C to get a login prompt.
Once you have logged in as admin, type zerotouch cancel at the prompt and hit enter. The switch will reboot into an empty configuration.
Log in as admin again. (no password)
Step 2: Set an admin password.
The switch allows for you to initially log into the switch as admin without a password through the console port only. Setting a password for the admin user will let you log into the switch from any port.
After logging in, you will be at a standard prompt. (localhost>)
Elevate to privileged mode by typing enable and hitting enter. Your prompt will change to locahost#
Now, put the switch into configure mode. Type config t and hit enter.
This command assigns the password wheatstone to the username admin:
Step 3: Assign a hostname
While at the (config) prompt, use the hostname command to name your switch
Step 4: Set up a management port (optional)
Most Artista switches have an out of band management port. Use these commands to assign it an IP address, assign a default gateway, and save it.
Once you have set this up, you have the option to configure using SSH instead of the serial console cable.
If you are working with a smaller switch that does not have a management port, your only choice is the console cable.
Step 5: Set up the WNIP VLAN
Wheatstone prefers that only WNIP devices are connected to a switch, but you may prefer keeping an administrative VLAN. Valid VLAN numbers are 1-4094.

The screen shots will show VLAN 1, the default VLAN. Arista suggests that you use any number besides the default, like VLAN 10 instead.
From the (config) prompt, type vlan 10 (or your preferred VLAN number)
Assign the VLAN a name by using the name command.
Then look at the state of the VLAN by entering show vlan 10. You will see what ports are connected (if any).
We also need to give the VLAN an interface; this will be used for the IGMP querier. Each switch will get its own IP address. The core switch should have the lowest IP. Example: if your core is 192.168.87.1, the first edge switch is 192.168.87.2.
The switches will choose the lowest IP as the querier.
Type exit when complete.
Step 6: Enable IGMP
From a (config) prompt:
- set IGMP version 2
- enable the querier
- set the query interval
- set the max response time
- set the querier address to the VLAN interface that you set above.
- write this to memory so it is saved.
Step 7: Set up the switch ports
There are two types of ports: Access and Trunk.
An Access port is a switch port that has a Wheatstone device on it, such as a Blade, Console, PC Driver, computer with WNIP software, Talent Station, etc.
A Trunk port is a port that connects two switches together. (ie leaf/spine, core/edge).
This is how to configure Access ports. You can configure a range of ports by typing a range (interface ethernet 1-45) or by a single port (interface ethernet 5). Type end to finish configuring the range/port.
This is how to configure trunk ports.
Step 8: Make sure you save your work with the write command, otherwise the changes will be lost when the switch is rebooted.
Checking Your Work
The show igmp snooping querier command will tell you the state of the querier.
In this example, there is a core switch where the querier address was set to 192.168.87.1 and an edge switch where the querier address was set to 192.168.87.2.
Once they have been trunked together, the core switch is elected querier by virtue of having the lowest IP address.